Title here
Summary here
Summary: A bill of materials and overall summary of the control box. What went into it, how much each item cost, and the small design choices that made the whole setup cleaner and easier to live with.
At the heart of the system is the electronics control box. My lights are split in to two separate runs, but everything comes from a single location in my garage.
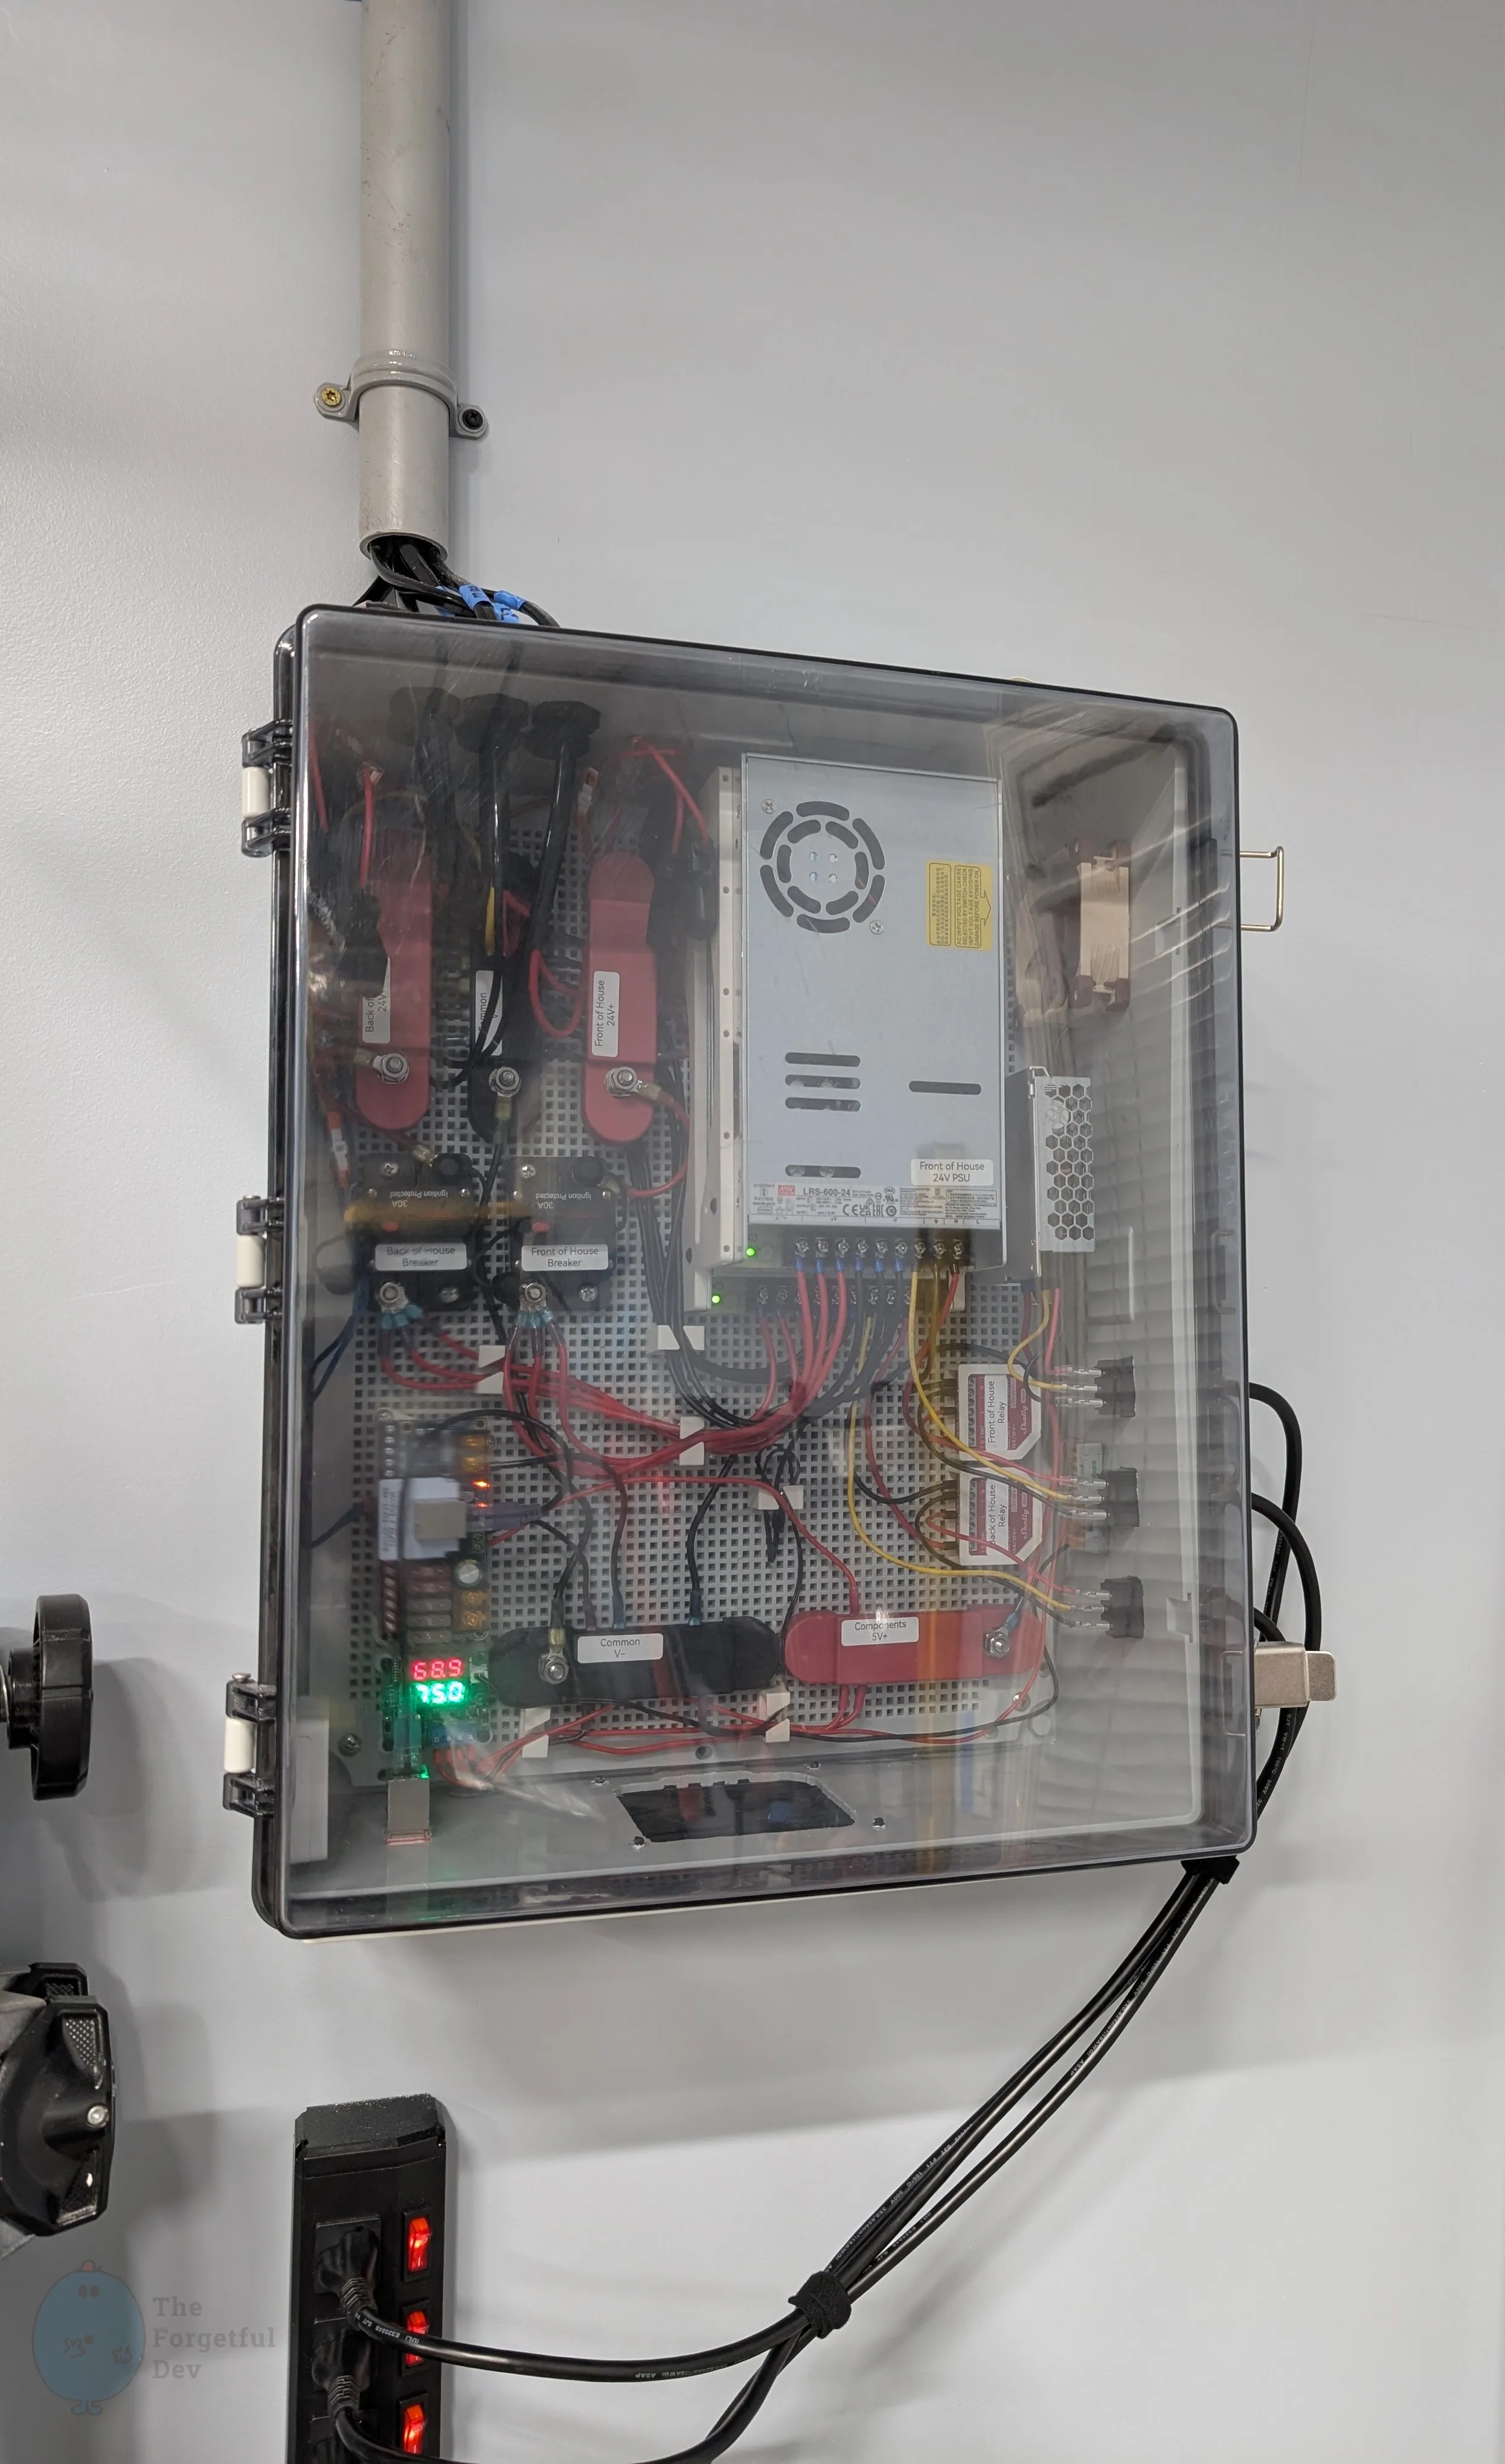
I have a bad habit of trying to get the smallest project box I can and I always end up hating myself for it. This box was going to be hanging on a wall in my garage and the amount of space it took up didn’t matter, so I decided to go with a nice big case so that I would have plenty of room (I discuss how I picked this size in the planning and design section). I hate to say it but at times while building it, I still wished I had gone bigger. But eventually I found a good layout for everything and I was really happy with it once it was done.
Heads up: I earn a commission on the Amazon items if you click on a link and buy it.
| Item | Qty | Total Cost | Link | Notes |
|---|---|---|---|---|
| #10 blue ring terminals (100 pieces) | 1 | $9.99 | Amazon | 14-16 AWG wire to smaller terminals |
| #10 red ring terminals (100 pieces) | 1 | $9.99 | Amazon | 16-22 AWG wire to smaller terminals |
| #10 yellow ring terminals | 1 | $9.99 | Amazon | 12 AWG wire to smaller terminals |
| 1/4" blue ring terminals (100 pieces) | 1 | $8.48 | Amazon | 14-16 AWG wire to larger terminals |
| 1/4" yellow ring terminals (50 pieces) | 1 | $9.99 | Amazon | 12 AWG wire to larger terminals |
| 3 foot plug | 3 | $15.09 | Amazon | For short neat runs to the power strip |
| 30 amp 5V relays (2 pieces) | 1 | $7.99 | Amazon | Didn’t end up using these |
| 30 amp breakers (2 pieces) | 1 | $18.04 | Amazon | A few comments have said I need to size these down & get something better quality. |
| C14 panel mount outlets (3 pieces) | 1 | $7.99 | Amazon | Allows for visually clean power connections |
| Conduit | 1 | $14.26 | HD | Clean run of lines from box to attic |
| Conduit wall clamps (5 pieces) | 1 | $3.62 | Amazon | To attach conduit to the wall |
| Control box enclosure (20.1’’×16.1’’×7.9’') | 1 | $104.39 | Amazon | |
| DC multimeter display | 1 | $15.29 | Amazon | Optional. I haven’t actually wired it up yet. |
| Extra mounting screws #6 x 1/2 Inch (100 pieces) | 1 | $7.49 | Amazon | Slightly smaller head than the ones that came with the standoffs |
| Fuse holders and fuses | 1 | $11.98 | Amazon | |
| Intake dust filter | 1 | $7.99 | Amazon | Installed at the bottom of the case |
| Machine screws / nuts / washers assortment | 1 | $19.99 | Amazon | Useful WELL beyond this project |
| Meanwell LRS-50-5 | 1 | $15.77 | Amazon | For controlling all 5V components |
| Meanwell LRS-600-24 PSU | 2 | $0.00 | $0 because they came with the light kit | |
| Noctua fan | 1 | $16.95 | Amazon | |
| PG13.5 cable glands | 1 | $9.95 | Amazon | Wouldn’t be water tight. Just used for clean cable entry to box. |
| Power distribution blocks (2 pieces) | 3 | $35.67 | Amazon | |
| Power strip | 1 | $23.09 | Amazon | I like the individually controlled outlets |
| Quinled dig-quad with Ethernet | 1 | $53.00 | DrZzs | |
| Shelly relays (2 pieces) | 1 | $54.30 | Amazon | Overkill, but it’s what I wanted |
| Standoffs | 1 | $7.99 | Amazon | Comes with a lot of screws. Also used 3d printed ones. |
| Temp fan controller | 1 | $9.99 | Amazon | Controls case fan based on temp |
| Threaded inserts | 1 | $14.99 | Amazon | Useful WELL beyond this project (if you have a 3d printer) |
| Wire ferrule terminals | 1 | $8.09 | Amazon | Enough to last you a lifetime |
| Zigbee temp sensor | 1 | $19.99 | Amazon | Optional. For remote monitoring of temp. |
| TODO: Component wiring | 1 | $0.00 | I used cable I already had. Need to figure out what sizes. |
On this list you’ll notice I have 30 amp 5V relays and Shelly relays. The purpose of these relays is to cut power to the two large Meanwell LRS-600-24 power supplies when the lights aren’t actually on. This is done by keeping the dig-quad powered from the 5V PSU and only triggering the relays when the big PSUs are needed. Most people choose to trigger the relays using the dedicated relay trigger port on the dig-quad, but I was struggling with that.
I originally had it setup using the relay output and the traditional offline 30A 5V relays linked above. It did its job except I had one issue I couldn’t solve: every time the dig-quad powered up (from an offline state), it would trigger the relays for <1s and then turn them back off. This happened regardless of any combination of settings.
I tried my relays in NC and NO. I tried the relay config in WLED set to both inverted and not (and alternated with NC/NO). I tried higher and lower amperage PSUs. I tried everything. No combination of things prevented the issue. In some setups the delay between opening and closing was fractionally faster, but it still happened.
I would have gone with a time delayed relay, but I couldn’t find one that supported the amps I needed. And by then I liked the idea of the Shelly relays anyways. The rest of my house is in Home Assistant already, and they add overheat protection and power monitoring as well so it was a win-win situation in the end. The cost is a lot higher than the typical “dumb” relays though.
The enclosure itself is waterproof and a number of the components and connectors I used are marine-grade. That obviously isn’t necessary considering this is installed in my garage. I could have saved money by simply mounting everything to some plywood and not using heat shrink connectors, but that wasn’t what I wanted. Partially because I think doing it this way simply looks better, but I also use my garage for all kinds of projects and I wanted the components to be protected from dust and debris.
If you actually need yours to be waterproof, the main thing I want to point out from my setup are the PG13.5 cable glands. I bought these oversized knowing that I didn’t need them to actually be waterproof. I just wanted a clean way for the cables to enter the box, and I sized up because I wanted to make sure my 12 AWG 2-wire and 14 AWG 3-wire both fit. You should size down (and don’t install them on top) if you need the whole thing to be waterproof.
