The Banana Pi runs klipper which (to simplify things) is your 3d printer’s firmware. It reads gcode and passes it along to the printer control board. The printer control board, an SKR Pico in the case of THE 100, is the board that actually interfaces with the motors, heaters, thermistors, etc, and allows klipper on the BPi – along with the firmware that you’ll flash to the SKR – to control them. In order for that to be possible, we have to get the BPi and the SKR Pico talking to each other.
Requirements
Your Banana Pi (or similar SBC) should be fully setup with klipper
A micro USB to USB C cable that supports data (some cables are charging only) OR a USB to Micro USB that supports data + a computer
A lot of people have had issues flashing the SKR via the BananaPi. This guide now includes a method to flash via your computer instead which eliminates the need to connect the SKR to the BPi via USB.
You need to solder header pins on to the SKR Pico for connecting the UART cable – at the minimum you need 5 pins in pin 2,4,6,8,10. That isn’t covered in this guide
A UART cable for connecting the BPi to the SKR (should have come in the box with the SKR). It should be 5 wires with a XH2.54 (white) connector on one side and DuPont (black) connector on the other.
🛑 Skipping any steps here will almost certainly result in things not working. If you're stuck on a step, back up and see if you missed something. If you're still stuck, come to discord and ask for help.
Generate firmware
Your Banana Pi should be powered via the power-only USB port (the one closest to the edge).
You can use your computer to power the USB cable, but if you have a quality wall plug, that’s even better
Connect to your BPi via ssh: ssh klipper@192.168.1.120 (as always, replacing my IP with yours)
This process should be pretty familiar to you by now
Not working? Your IP may have changed. Probably time to set a static IP!
You should be at the klipper@bananapim2zero:~/klipper$ prompt
Type cd klipper and hit enter to enter the klipper directory
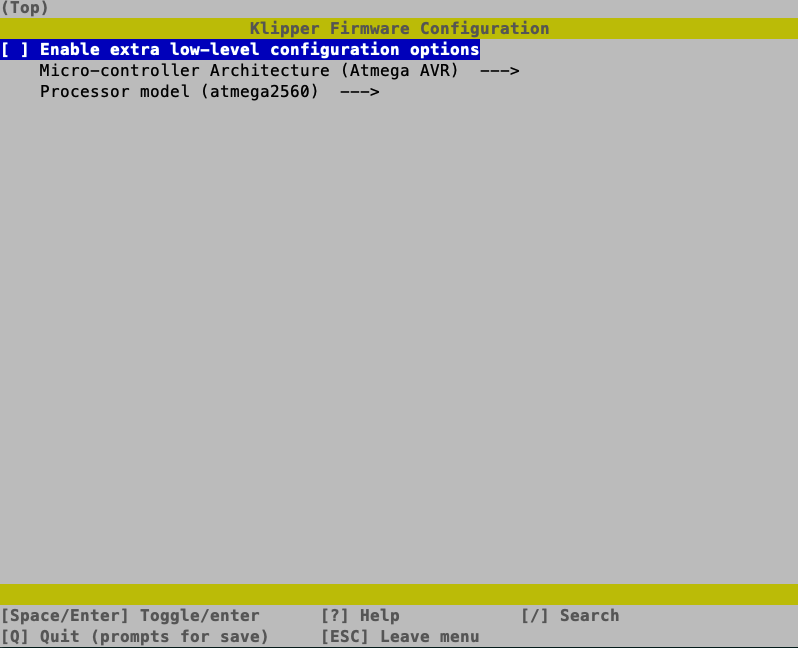
Type make menuconfig to start the klipper firmware configuration
Hit enter to select Enable extra low-level configuration options
Arrow down to Micro-controller Architecture and hit enter
Arrow down to Raspberry Pi RP2040 and hit enter
Arrow down to Communication interface and hit enter
Arrow down to Serial (on UART0 GPIO1/GPIO0) and hit enter
Should look like this
Press Q to quit, then Y to save
You should now be back at the klipper@bananapim2zero:~/klipper$ prompt
Type make and hit enter to start compiling the firmware
This will take a few minutes to finish
Once complete, the last line should say Creating uf2 file out/klipper.uf2
Flash the firmware
Previously this guide only covered how to do this by connecting the SKR to the BPi, but a lot of people had issues with that method. I have now also included how to do it by retrieving the generated firmware via fluidd, and then use your computer to flash the SKR. This method is near foolproof and is now the recommended option. In either case, you need to set some jumpers on the SKR first.
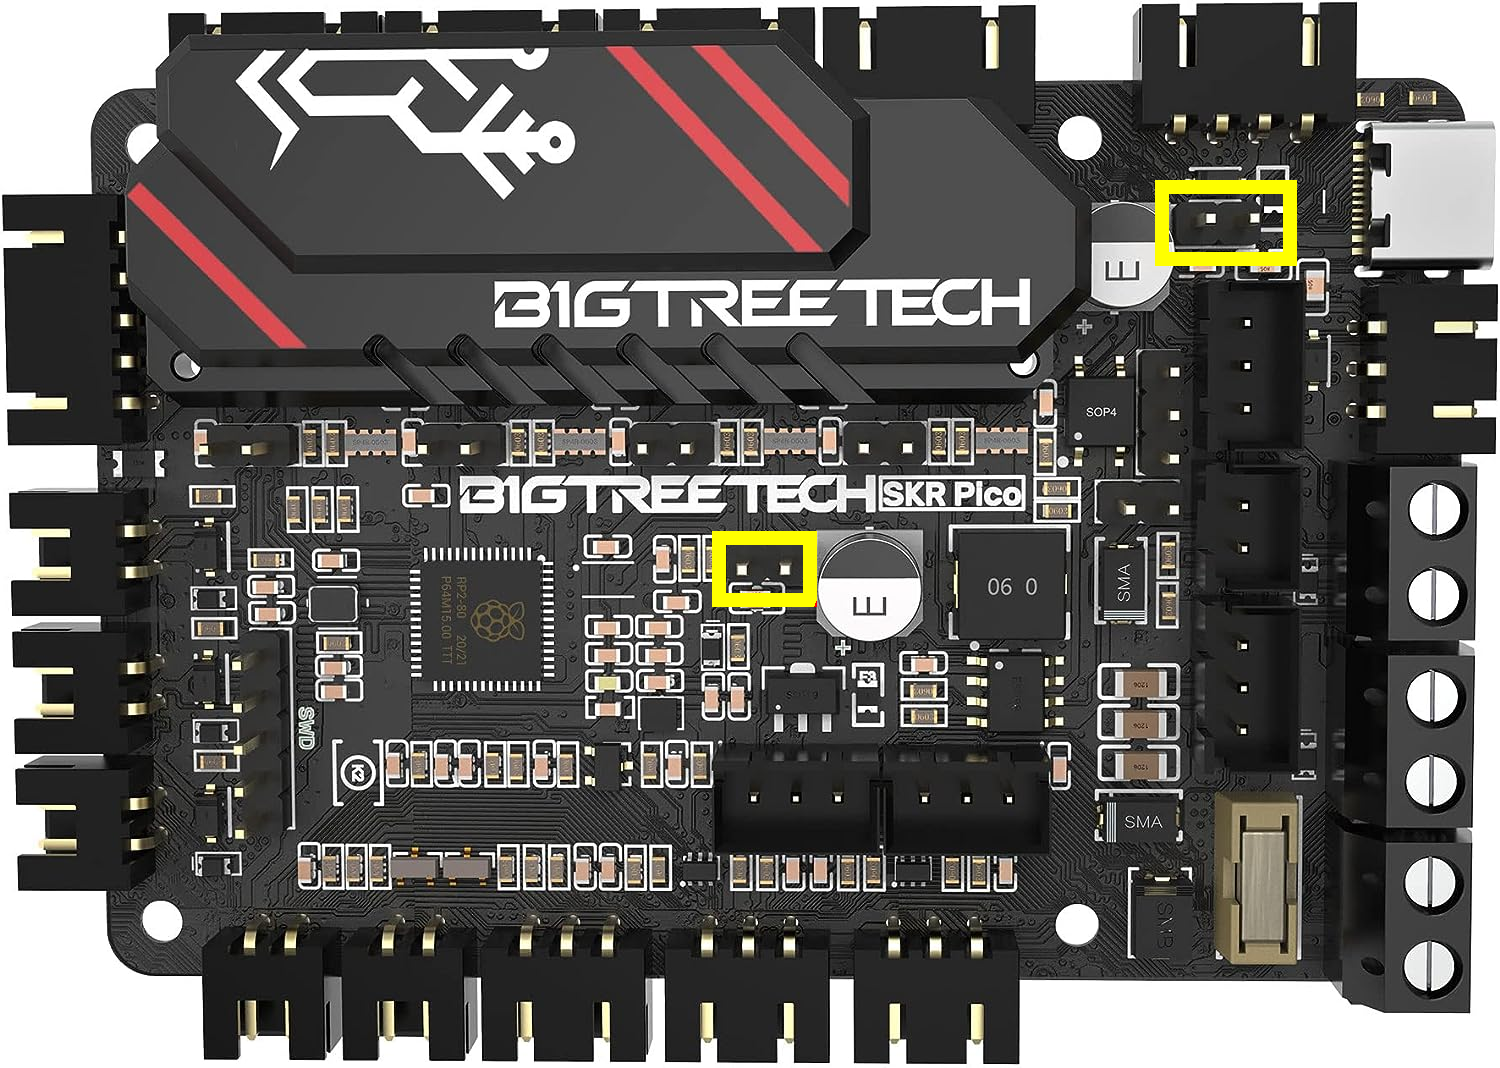
SKR jumpers
Ensure you have jumpers on the SKR Pico to unlock the bootloader (the yellow highlighted one near the middle) and to enable USB power (near the corner by the USB port)
Option 1: use fluidd and your computer (recommended)
In the SSH session on your BPi, type cp ~/klipper/out/klipper.uf2 ~/printer_data/config/klipper.uf2 and hit
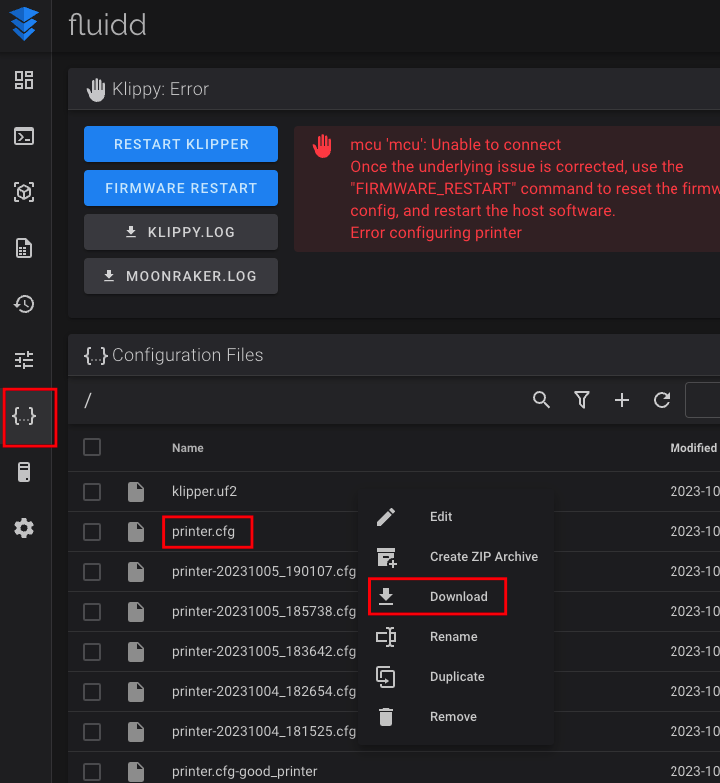
In your web browser, go to the IP of your BPi. This should load the fluidd web UI.
Click Configuration on the left side, then under Configuration Files click on klipper.uf2 and click Download.
This will save the compiled firmware to your computer
Plug the SKR Pico in to your computer. It will show up as an external drive, just like a USB flash drive
If it doesn’t show up then either your jumpers aren’t set correctly on the SKR, or the cable you’re using is power only and doesn’t support data
Drag and drop the downloaded klipper.uf2 file on to the mounted drive
The SKR will reboot automatically which indicates it received the firmware and has flashed it. It will then reconnect as an external drive.
If you look at the files on the drive, klipper.uf2 should no longer be there. That’s a good thing and indicates a success.
Wait a few seconds and then eject the drive, then unplug the SKR from your computer.
Remove the jumper you put on the SKR Pico earlier (the one in the middle of the board) that puts it in to bootloader mode
Your SKR firmware is now flashed! Jump down to UART to continue.
Option 2: use BPi connected to SKR
Skip these steps and go down to UART if you already followed option 1.
Connect a cable from the OTG USB port on the BPi (the USB port closer to the middle) to the USB C port on the SKR Pico
The SKR Pico should have a solid red light. Wait about 30 seconds before proceeding.
Type ls /dev/sda* and hit enter. You should get a response similar to the one below.
If you don’t, wait 30 seconds and try again.
If that doesn’t work, do sudo reboot now, then wait about 1 minute for everything to come back online. ssh to your BPi (step 4 above) and try again.
If you still don’t see anything then you either don’t have the firmware jumper put on, or the USB cable you’re using between the BPi and the SKR Pico doesn’t support data. Or you’re an unlucky one that this process just isn’t going to work for you. Use option 1 above instead.
Continuing from the previous section, you should be at the klipper@bananapim2zero:~/klipper$ prompt
sudo mount /dev/sda1 /mnt and hit
sudo cp out/klipper.uf2 /mnt and hit
sudo umount /mnt and hit
You won’t see anything happen while the SKR Pico is flashed. This process happens automatically after you umount.
Before continuing we want to confirm the SKR Pico is done flashing. Type ls /dev/sda* and hit enter. You should get a response similar to the one below (this is the same step you repeated earlier). If you don’t, wait 30 seconds and try again.
Doing this shows that the SKR has rebooted and reconnected which means the firmware update has completed
Unplug the USB cable that goes between the BPi and the SKR Pico
We won’t need this cable anymore
Remove the jumper you put on the SKR Pico earlier (the one in the middle of the board) that puts it in to bootloader mode
UART
Note: There are some added steps here compared to Matt’s video. The process is the same but these added steps give you several checks along the way to verify things are working as expected. That way if they aren’t, it’s easier to identify where the problem is.
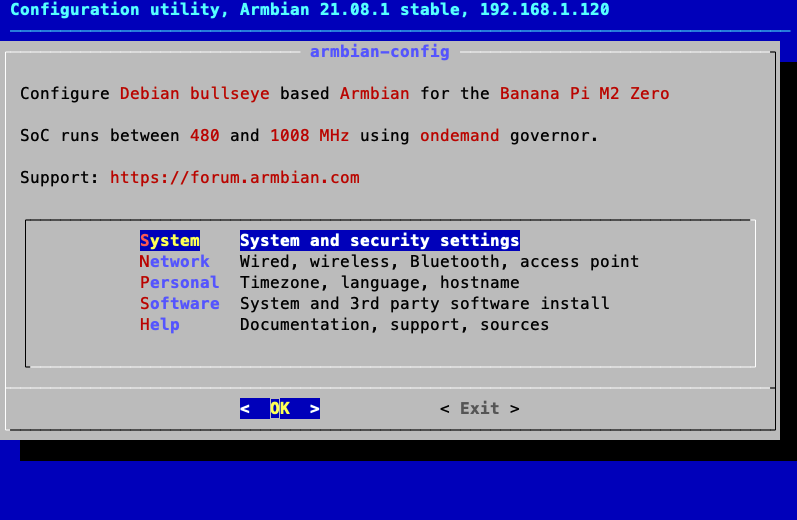
From your ssh session to your BPi, type sudo armbian-config
System
Hardware
uart3 press space to select it, then enter to save
You will be returned to the hardware menu. Press then to go back.
You will be prompted to reboot. Press to select Cancel and then .
Select Back and then Exit to be returned to the command prompt.
Type sudo shutdown now to shutdown the BPi
Unplug power from the BPi
Configure printer.cfg
Before continuing: Your BPi and SKR Pico should be powered off. The firmware jumper on the SKR Pico should be removed. There should be no USB cable connected between the BPi and Pico.
Connect the UART cable between the BPi and SKR Pico
This is the 5-wired cable that came with the SKR. The first red wire should be connected to pin 2 on the BPi, with the green wire connected to pin 10. The connector on the Pico side only goes one direction.
USB cable between BPi and SKR should not be connected
Power on the BPi. The SKR Pico should power on as well.
If it doesn’t, something is wrong with header pins or direction of UART.
In your web browser, go to the IP of your BPi. This should load the fluidd website.
If it doesn’t load, wait a minute and try again.
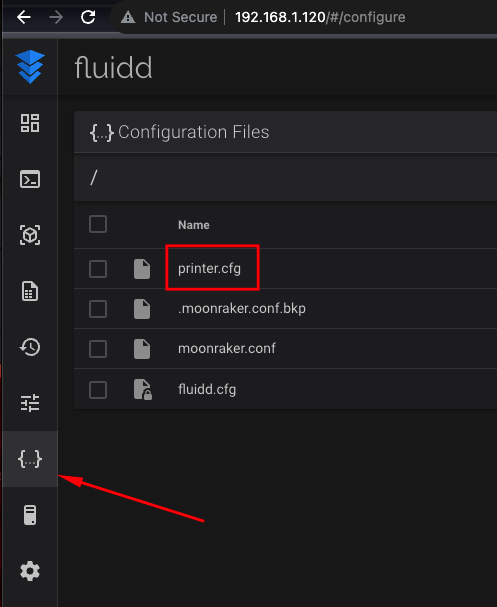
On the left hand side of the page, click on the configuration icon
Click on printer.cfg to open the editor
Starting on line 6 you want to change the [mcu] section:
Before:
[mcu]
serial: /dev/serial/by-id/<your-mcu-id>
After:
[mcu]
serial: /dev/ttyS3
restart_method: command
Click Save & Restart at the top
It will briefly say Klippy not connected, then the red error messages should go away and you should be connected!