Title here
Summary here
If you’ve ever wondered what people mean by “3-2-1 backup”, here’s the short version:
Why bother? Because if your primary data is lost or corrupted, and your only backup is also local, you still have a single point of failure. The 3-2-1 rule gives you redundancy, media diversity, and physical separation. It’s not perfect, but as a baseline for home and homelab setups, it’s solid.
I have a friend that is setting up his first unraid server and I’ve been going along for the ride. I’ve been giving him some help and tips along the way, and backups are the next thing we need to talk about. I was typing him up a long message about all of this, but I decided to post it on here instead.
Here’s how I apply the 3-2-1 rule on my Unraid server. The goal is to keep things automated, monitored, and simple. I don’t cover every single detail and every single configuration step, but this should definitely be enough to get you going.
This mostly focuses on backing up the things running on your unraid server like all your containers and services, but I do touch on also backing up your personal media.
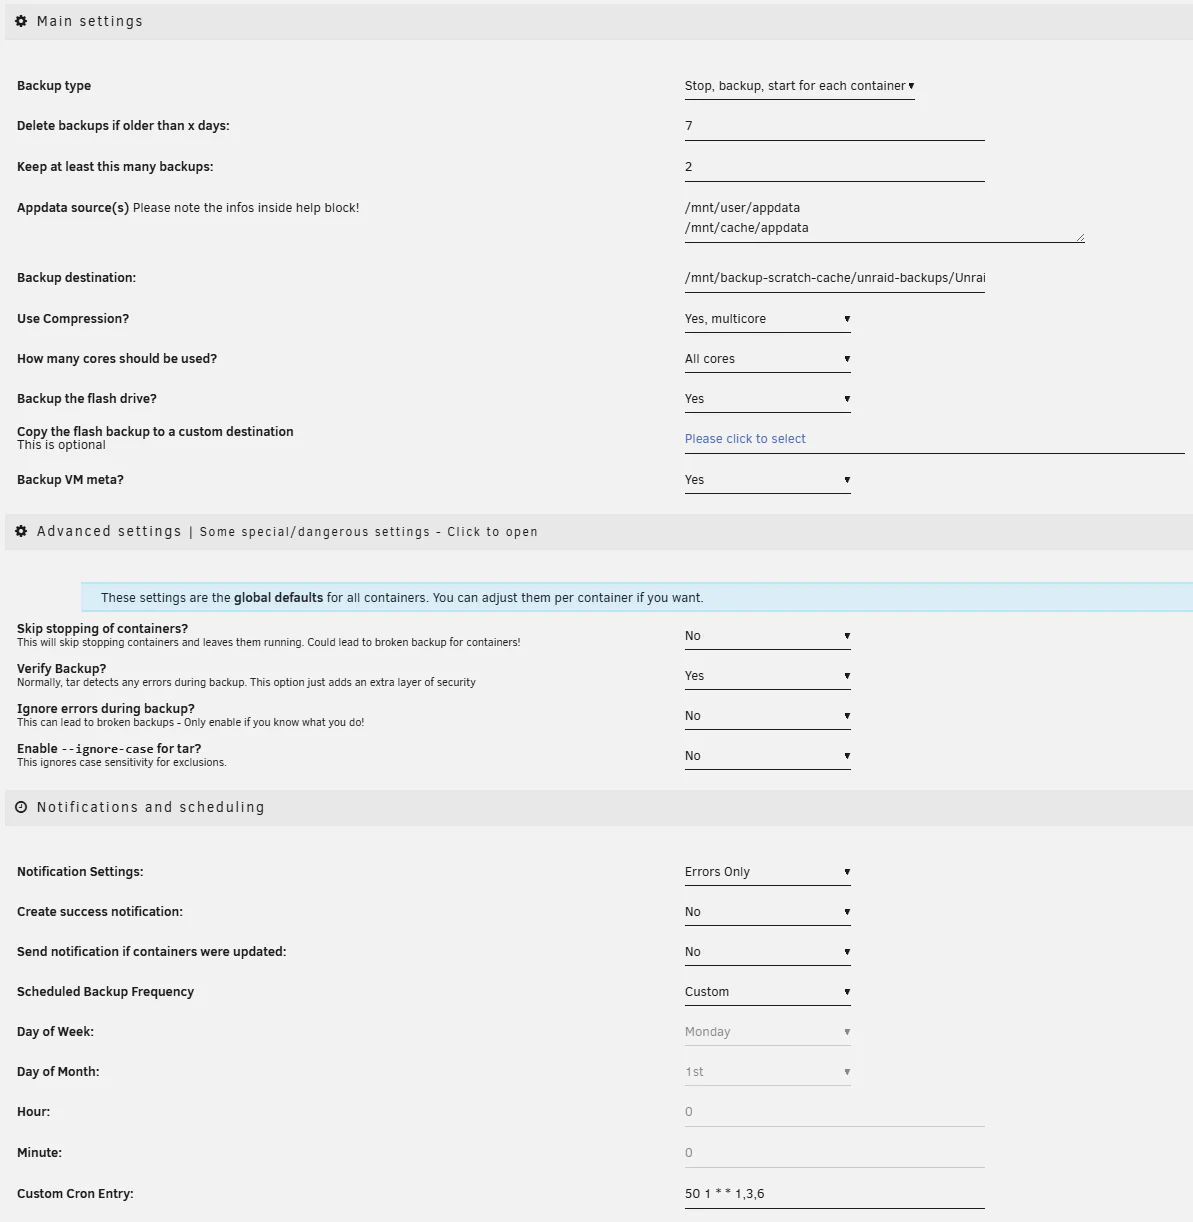
I use the Unraid plugin Appdata backup to back up my docker container configurations and my bootable flash drive. These backups go to a “scratch” drive that is not part of the Unraid array; it’s mounted via the Unassigned Devices plugin (Why outside the array? Speed. The array requires parity calculations on every write, and that slows backup jobs down.).
Note: While writing this I saw that the original dev of appdata backup announced they’ll no longer be maintaining this app as of 4 months ago. I’m certain that the community will fork it and keep it going, and it appears unraid is working on their own backup solution anyways, AND I’m sure it will keep working for a long time with no fixes needed… but it’s still something to keep in mind.
This gives me one local backup copy on a drive separate from the array. The essential config files on my flash drive are also backed up to unraid.net via Unraid Connect as well, but that’s just a bonus.
My appdata backup configuration:
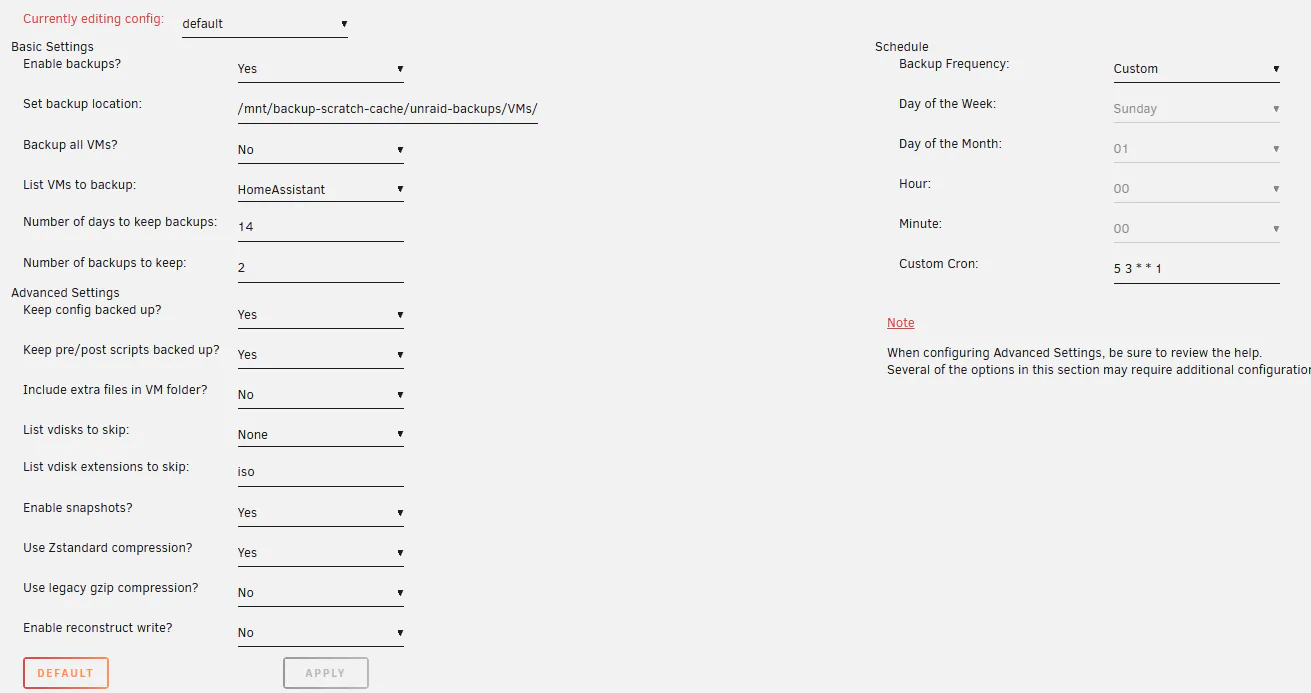
I use the Unraid plugin VM Backup to back up my VMs to the same scratch drive. This captures both VM state and configuration in one place. This plugin is beta only and hasn’t had an update in over a year, but it’s simple and does exactly what I need.
My VM backup configuration:
After those backups finish, I use a simple shell script run by the User Scripts plugin to copy the finished backups to the Unraid array and to an external USB drive.
Copying to the array isn’t a huge benefit, but storage is cheap and a spare copy never hurts. The USB drive is mostly there because I had it lying around, but it gives me a physically separate copy I can grab quickly if I ever had to.
As the backups on the scratch drive get removed by appdata backup and VM backup (how long they remain there is configured in their individual settings), they also get removed from the array and the external USB drive by this script. They’ll continue existing in my offsite backup for longer, but we haven’t gotten to that yet.
This script uses healthchecks.io for monitoring. I’ll talk more about that below.
Note: I use a similar setup to retain multiple copies of my music collection, of my personal pictures, and of my documents. I have each of them living on both the unraid array and on a drive separate from the array, and all get copied to my offsite backup as well (we’ll be talking about that shortly).
# ========= CONFIG =========
HC_URL="https://hc-ping.com/KEY"

LOG_DIR="/var/log/backup-of-backup"
mkdir -p "$LOG_DIR"
RUN_ID="$(date -u +'%Y%m%dT%H%M%SZ')"
LOG_FILE="$LOG_DIR/backup-of-backup_$RUN_ID.log"

# Paths
SRC_CA="/mnt/backup-scratch-cache/unraid-backups/Unraid-CA-Backup/"
SRC_VMS="/mnt/backup-scratch-cache/unraid-backups/VMs/"

DST_ARRAY="/mnt/disk1/Backups/Unraid-CA-Backup/"
USB_MNT="/mnt/disks/WD-USB"
DST_USB_CA="$USB_MNT/unraid-backups/Unraid-CA-Backup/"
DST_USB_VMS="$USB_MNT/unraid-backups/VMs/"

# ========= HC helper =========
hc_ping() {
  # $1 is suffix: "", "/start", "/fail" or "/<exitcode>"
  if [[ -s "$LOG_FILE" ]]; then
    curl -fsS -m 10 --retry 3 -o /dev/null --data-binary @"$LOG_FILE" "$HC_URL$1" || true
  else
    curl -fsS -m 10 --retry 3 -o /dev/null "$HC_URL$1" || true
  fi
}

# ========= SAFETY & LOGGING =========
set -Euo pipefail
exec > >(tee -a "$LOG_FILE") 2>&1

echo "==> START: $(date -u +'%Y-%m-%d %H:%M:%SZ')"
hc_ping "/start"

# Track per-step results
declare -i OVERALL_STATUS=0
declare -a FAILURES=()

run_step() {
  # Usage: run_step "Label" command [args...]
  local label="$1"; shift
  echo ""
  echo "===== $label ====="
  if "$@"; then
    echo "[$label] OK"
  else
    local ec=$?
    echo "[$label] FAILED (exit $ec)"
    FAILURES+=("$label (exit $ec)")
    OVERALL_STATUS=1
  fi
}

# ========= PRECHECKS (non-fatal; they just influence steps) =========
echo "Prechecks:"
if [[ ! -d "$SRC_CA" ]]; then
  echo "  WARN: Source CA path missing: $SRC_CA"
fi
if [[ ! -d "$SRC_VMS" ]]; then
  echo "  WARN: Source VMs path missing: $SRC_VMS"
fi
if ! mountpoint -q "$USB_MNT"; then
  echo "  WARN: USB not mounted at $USB_MNT (USB steps will fail fast)"
fi
if [[ ! -d "$(dirname "$DST_ARRAY")" ]]; then
  echo "  WARN: Array base path missing: $(dirname "$DST_ARRAY")"
fi

# Create expected destination directories (USB creation only makes sense if mounted)
mkdir -p "$DST_ARRAY" || true
if mountpoint -q "$USB_MNT"; then
  mkdir -p "$DST_USB_CA" "$DST_USB_VMS" || true
fi

# ========= RSYNC OPTIONS =========
RSYNC_OPTS=(--archive --verbose --human-readable --delete)

# ========= STEPS =========
run_step "1: CA backup SSD → Array" \
  rsync "${RSYNC_OPTS[@]}" "$SRC_CA" "$DST_ARRAY"

run_step "2: CA backup SSD → USB" \
  bash -c 'mountpoint -q "'"$USB_MNT"'" && rsync '"${RSYNC_OPTS[*]}"' "'"$SRC_CA"'" "'"$DST_USB_CA"'"'

run_step "3: VM backup SSD → USB" \
  bash -c 'mountpoint -q "'"$USB_MNT"'" && rsync '"${RSYNC_OPTS[*]}"' "'"$SRC_VMS"'" "'"$DST_USB_VMS"'"'

# ========= SUMMARY & HEALTHCHECKS =========
echo ""
if (( OVERALL_STATUS == 0 )); then
  echo "==> SUCCESS: All steps completed at $(date -u +'%Y-%m-%d %H:%M:%SZ')"
  hc_ping ""  # success
  exit 0
else
  echo "==> FAILURE: One or more steps failed at $(date -u +'%Y-%m-%d %H:%M:%SZ')"
  echo "Failed steps:"
  for f in "${FAILURES[@]}"; do echo "  - $f"; done
  # Send /fail with log (use /1 to include a code)
  hc_ping "/1"
  exit 1
fiTo satisfy the off-site part of 3-2-1, I use a 5 TB Hetzner Storage Box. You can save a good amount if you only need a 1TB box, but I have some pretty heavy backups.
On my Unraid server I run borgmatic (installed via Community Apps) which syncs my backups to the storage box (I also use this to backup things like important documents, pictures, and a handful of other things that aren’t directly related to the unraid backups we’ve been talking about so far).
I currently have 37.8TB backed up to Hetzner across all my archives, but after deduplication it’s only 3.89TB! And I can enable compression if I need to save more. I love borg!
Here is my borg config.yaml file:
constants:
    hostname: unraid
    prefix: backup-

source_directories:
    - /boot
    - /mnt/user/appdata
    - /mnt/disks
    - /mnt/user/Backups
    - /mnt/user/Shares
    - /mnt/user/proxmox

repositories:
    - path: ssh://X@Y.your-storagebox.de/./backups/unraid
      label: hetzner

files_cache: mtime,size

patterns:
    - '- [Tt]rash'

exclude_if_present:
    - .nobackup
    - .NOBACKUP

exclude_patterns:
    - /mnt/user/appdata/vm
    - /mnt/user/Backups/Unraid-CA-Backup
    - /mnt/user/appdata/plex/Library/Application Support/Plex Media Server/Cache

encryption_passphrase: "REMOVED"
compression: none
ssh_command: ssh -i /root/.ssh/id_rsa -p23
archive_name_format: "{hostname}-{now:%Y-%m-%dT%H:%M:%S.%f}"

keep_hourly: 8
keep_daily: 7
keep_weekly: 4
keep_monthly: 12
keep_yearly: 2

checks:
    - name: repository
      frequency: 2 weeks
    - name: archives
      frequency: 2 weeks

check_last: 14

before_backup:
    - echo "Starting a backup."

before_check:
    - echo "Starting checks."

after_backup:
    - echo "Finished a backup."

on_error:
    - echo "Error during create/prune/compact/check."

healthchecks:
    ping_url: https://hc-ping.com/KEY
    states:
        - start
        - finish
- failI use the free hosted version of healthchecks.io to monitor each step of the backup chain (ok, I actually don’t have appdata backup or VM backup checking in; I should add those). Each script or job sends a heartbeat when it finishes. If something doesn’t run when it should have, or if it errors during, I get notified automatically.
It is possible to self-host healthchecks.io, but I didn’t want an issue with my setup to cause both unraid backups to be failing and for me to not get notified about it.
If you want to replicate my setup, here’s the quick version.
/mnt/disks/backup_scratch)/mnt/disks/backup_scratch/appdata_backup)/mnt/disks/backup_scratch/vm_backup)My backups boil down to this: quick local backups on a scratch drive, redundant copies to a USB drive and the array, and an off-site snapshot via borgmatic to Hetzner. With healthchecks.io watching everything, I know pretty quickly if something breaks.
This setup isn’t fancy, but it works consistently and keeps me covered. Feel free to borrow whatever parts make sense for you.